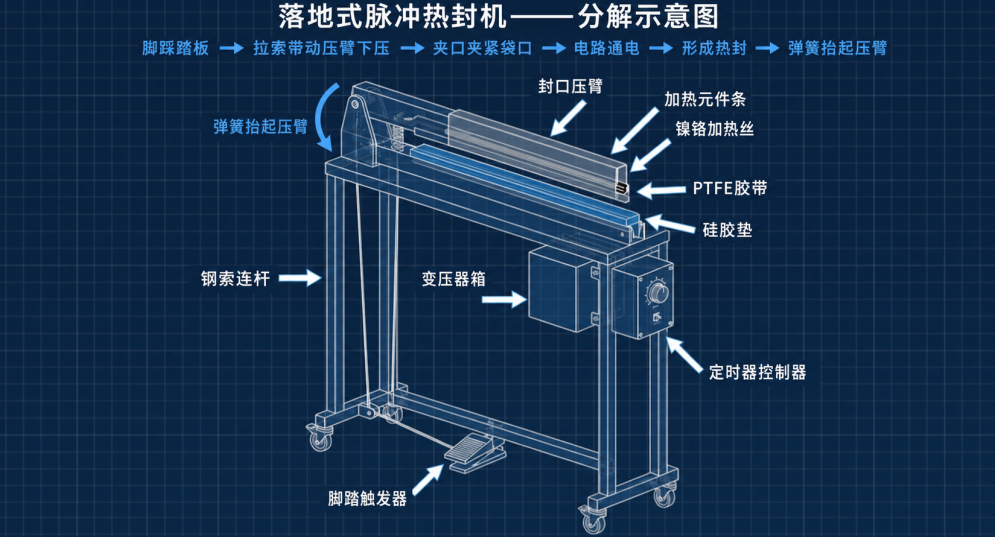
Floor-standing foot-operated heat sealers (also known as foot-operated pulse sealers or pedal-operated sealers) differ fundamentally from benchtop manual sealers in both appearance and function. Rather than being placed on a work surface and operated by manual pressure, this equipment is mounted independently on a four-legged steel vertical frame, with a height adjustable to meet operational needs; the sealing head is positioned at chest or waist height, while the foot pedal is placed on the floor, with the two connected via a steel cable or mechanical linkage running along the frame.
Physical Structure of the Equipment
The entire machine is divided into three independent structural areas:
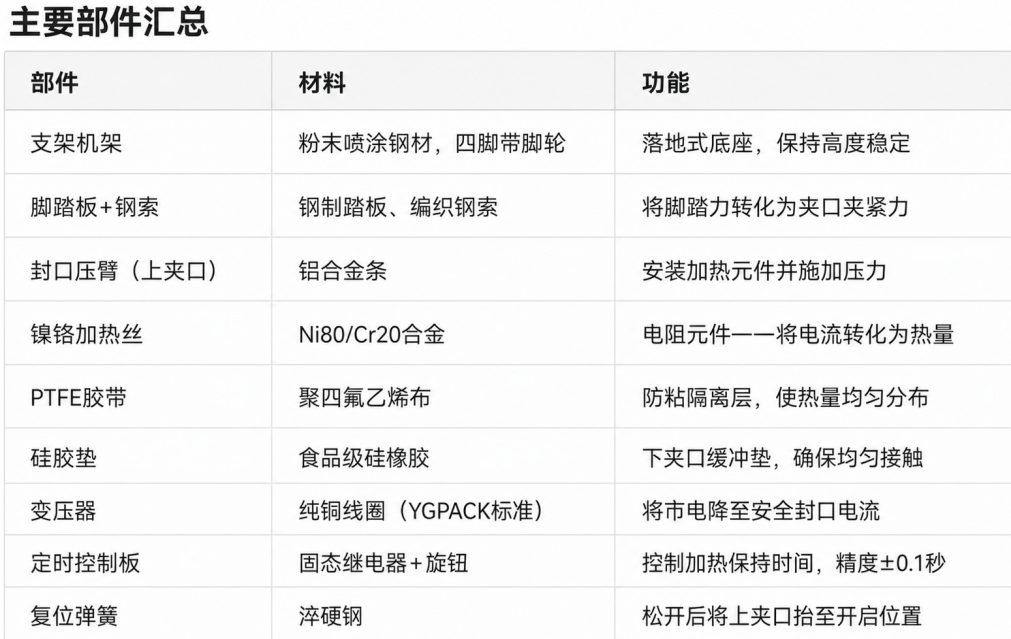
Lower Section — Vertical Frame: Four steel legs (most of which are equipped with casters for easy movement) form a sturdy floor-mounted base. The footrest is mounted at floor level and is typically hinged to the lower crossbar of the frame.
Central Section — Sealing Head: The height of the horizontal sealing platen is adjustable (typically 80–110 centimeters above the ground). The upper platen features built-in nickel-chromium heating elements and Teflon tape; the lower fixed base is equipped with silicone rubber cushioning pads.
Upper / Side Area — Control Box: The transformer and timer circuit board are integrated into a box mounted on the frame or sealing head, equipped with knobs or a digital control panel for easy adjustment by the operator.
Complete Sealing Process
Step 1—Pedal the pedals
The operator steps down on the floor pedal. A steel cable (or a rigid connecting rod on heavy-duty models) transmits the downward force along the frame to the sealing platen shaft. The sealing platen rotates downward, causing the upper heating platen to press tightly against the silicone cushion below, with the packaging film clamped between them. A mechanical pressure of 15–30 kilograms is continuously applied.
Step 2—Circuit Activation and Pulsed Heating
When the pressure head makes contact (or reaches the set pressure value), the microswitch closes, energizing the transformer’s low-voltage secondary circuit. Current flows through the nichrome (80% nickel / 20% chromium) heating wire, generating heat through the Joule effect. Depending on the timer settings and the film material, the heating wire can reach a temperature of 150–220°C within 0.3–1.0 seconds. The Teflon tape wrapped around the heating wire evenly conducts heat and prevents the molten film from sticking to the heating element.
Step 3—Sealing, Forming, and Cooling Under Pressure
Under the combined effect of heat and clamping pressure, the films melt and bond together; the polymer chains of the two film layers interpenetrate, forming a seal with a bond strength greater than that of the film itself. The platen must remain clamped until the timer completes the full pressure-holding cycle (heating + cooling phases); only then may the operator release the foot pedal. If the pedal is released before the seal has cooled, the seal may crack or deform.
Step 4—Spring Reset
When the foot pedal is released, the return spring (gas spring) raises the upper sealing head to the open position. The nichrome heating element rapidly cools to ambient temperature. This is the key advantage of pulse sealing: there is no continuous heating between operations, making it safe to touch and eliminating standby power consumption.